
I wanted to see whether I could connect Canva to Claude and turn a written prompt into a complete design without manually arranging every element inside Canva.
So, I tested the process myself.
I opened Claude’s connector settings, connected my Canva account, approved the requested permissions, and used a detailed prompt to generate a promotional design. I then reviewed the result and checked the available download options.
The process was simpler than I expected, but the connection itself was only one part of the workflow. I also had to give Claude clear instructions about the layout, visual style, text, and dimensions I wanted.
In this guide, I’ll share the exact steps I followed to connect Canva to Claude AI and create my first design with the integration.
TL;DR: How Do You Connect Canva to Claude?
You can connect Canva to Claude by opening Claude’s Connectors Directory, selecting Canva, and approving the authorization request.
Once connected, you can ask Claude to create a design using a natural-language prompt. The design can then be reviewed and, depending on the result and interface available to your account, downloaded or opened for further editing.
Here is the complete process:
- Open Claude.
- Access the Connectors Directory.
- Find and select Canva.
- Review the requested permissions.
- Authorize the connection.
- Start a new Claude conversation.
- Enter a detailed design prompt.
- Review and download the generated design.
The connection itself appears straightforward. However, the quality of the result depends heavily on how clearly you describe the layout, format, visual style, copy, and intended use.
What I Needed Before Connecting Canva to Claude
Before starting, I made sure I had access to:
- An active Claude account
- An active Canva account
- Claude’s Connectors Directory
- Permission to connect an external application
- A clear idea of the design I wanted to create
I was already signed in to both Claude and Canva in my browser.
This was worth checking because Canva automatically opened the account that was active during the authorization process. If you manage personal, client, or company accounts, make sure you are signed in to the correct one before approving the connection.
I also prepared a rough idea for the design beforehand. My goal was to create a 16:9 promotional poster featuring a laptop, product benefits, and a call-to-action button.
With that ready, I started the connection process.
If you are comparing Canva Free, Pro, or team features before connecting it, see my Canva pricing guide.
How I Connected Canva to Claude AI
Step 1: I Opened Claude’s Customize Section
I started by opening Claude and selecting Customize from the left-hand sidebar.
This took me to the area where Claude manages connected applications, skills, and plugins. On this page, I could see an option for connecting external apps.
The option was easy to find because it appeared near the top of the Customize page.
I selected it to open Claude’s available integrations.
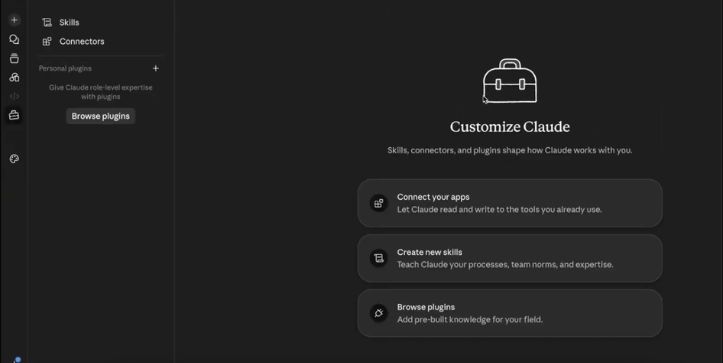
This second frame provides more context because it shows the options for connecting apps, creating skills, and browsing plugins.
Step 2: I Found Canva in the Connectors Directory
After selecting the option to connect an application, Claude opened its Connectors Directory.
This page displayed the external tools that could be linked to Claude. Canva appeared as a separate connector card alongside several other applications.
I located the Canva card and selected it to begin the setup.
The directory made this part of the process straightforward. I did not have to enter a server address, API key, or any technical configuration manually.
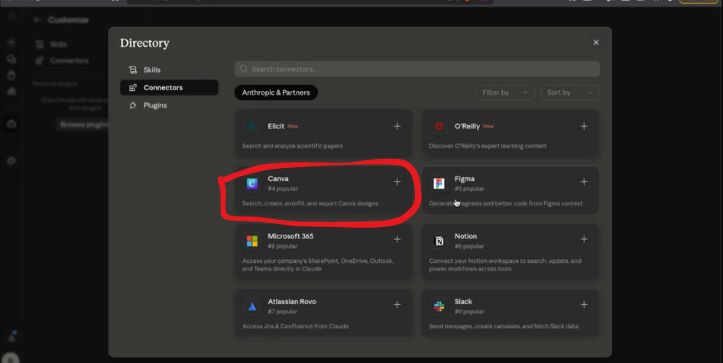
Make sure the Canva logo and the Connectors Directory heading are visible in the screenshot. That gives readers enough context to understand where the integration is located.
Step 3: I Granted Claude Access to Canva
After I selected Canva, Claude displayed a confirmation window with the message Grant access to Canva.
This was an initial confirmation rather than the final authorization. Claude first needed my permission to open Canva’s account-approval page.
I reviewed the message and selected the button to continue.
Claude then redirected my browser to Canva, where I could review the actual permissions requested by the integration.
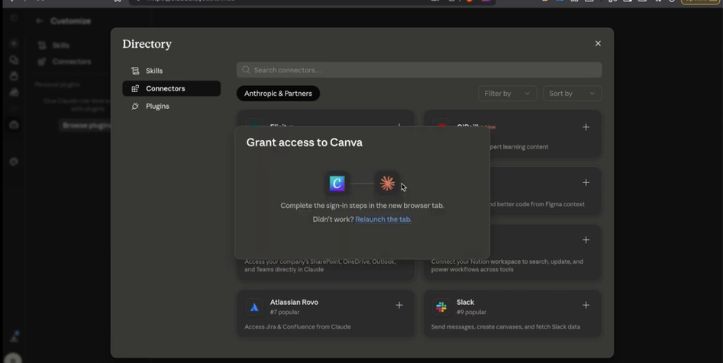
At this stage, the two accounts were not connected yet. I still had to verify my Canva account and approve the permissions on Canva’s authorization page.
Step 4: I Reviewed the Canva Permissions and Clicked Agree
After Claude redirected me, Canva opened its authorization page.
This page showed the permissions the connector was requesting before it could access my Canva account. I checked that I was signed in to the correct account and reviewed the information displayed on the screen.
This is an important step, especially if you manage multiple Canva accounts or work with client designs. You should always confirm which account is active before approving an external integration.
Once I had reviewed the requested access, I clicked Agree to complete the authorization.
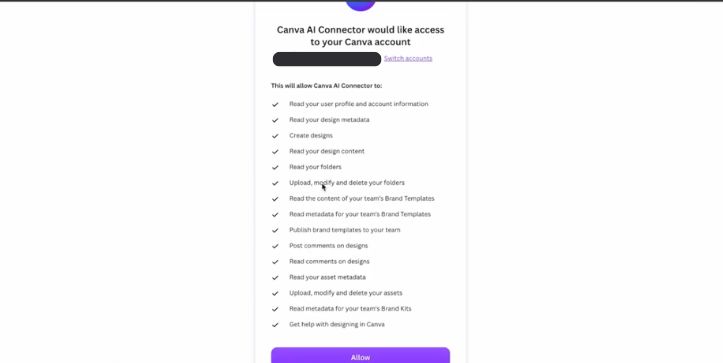
Before adding this screenshot to the article, crop or blur any personal information such as your name, email address, profile image, or team details.
Step 5: I Confirmed That Canva Was Connected Successfully
After I approved the permissions, Canva displayed an Authorization Successful message.
This confirmed that Claude had been connected to my Canva account.
A few seconds later, the browser redirected me back to Claude’s Customize page. I did not have to enter an API key or complete any additional technical setup.
Screenshot to add: Authorization Successful confirmation
Video timestamp:00:47–00:49
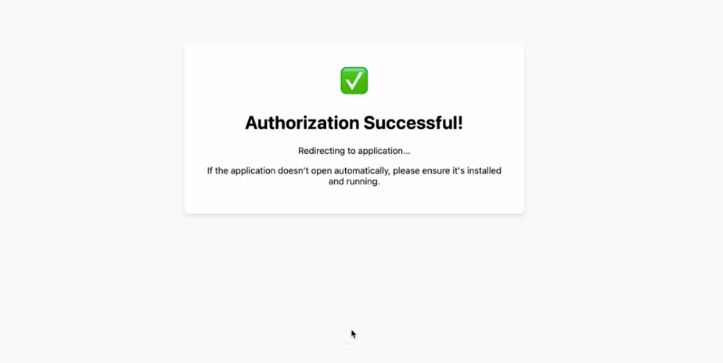
At this point, the account connection was complete, and I could move on to testing the integration with an actual design request.
Step 6: I Prepared a Detailed Design Prompt
Once Canva was connected, I returned to Claude and prepared the prompt for my design.
My goal was to create a 16:9 promotional poster featuring a laptop as the main subject. I wanted the visual to include a product headline, supporting text, feature icons, and a clear call-to-action button.
Instead of entering a short prompt such as “Create a laptop poster,” I gave Claude a more detailed creative brief.
I described:
- The type of design I wanted
- The required 16:9 aspect ratio
- The background and lighting
- The position of the laptop
- The headline and supporting copy
- The number of feature icons
- The call-to-action button
- The overall visual style
The prompt was similar to this:
Create a premium Apple-inspired promotional poster for the Apple MacBook Air M5. Use a clean white and light gray background with soft gradients and subtle shadows. Place a sleek MacBook Air M5 at the center, opened at a slight angle, displaying a vibrant macOS wallpaper. Add the headline “Introducing MacBook Air M5” in large, elegant typography, with the subheading “Supercharged by Apple Silicon” beneath it. Include feature icons and text for “M5 Chip”, “All-Day Battery Life”, “Ultra-Thin Design”, “Liquid Retina Display”, and “AI-Powered Performance”. Use Apple’s minimalist design style with plenty of white space and premium lighting effects. Add a small Apple logo and a call-to-action button reading “Learn More”. Create the design in 16:9 aspect ratio with a high-end, futuristic look suitable for YouTube thumbnails, banners, or advertisements.
Giving Claude these details reduced the amount of information it had to guess.
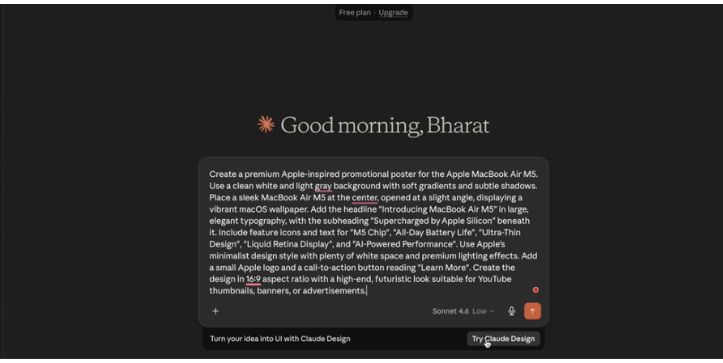
Step 7: I Submitted the Prompt and Generated the Design
After reviewing the prompt, I submitted it in Claude.
Claude processed the request through the Canva connector and generated the promotional visual directly inside the conversation.
The result included the main elements I had requested:
- A laptop as the central subject
- A prominent product headline
- Supporting copy
- Feature icons
- A call-to-action section
- A clean promotional layout
What stood out to me was that Claude did not return only a written design suggestion. It displayed the completed visual inside the conversation, allowing me to review the result immediately.
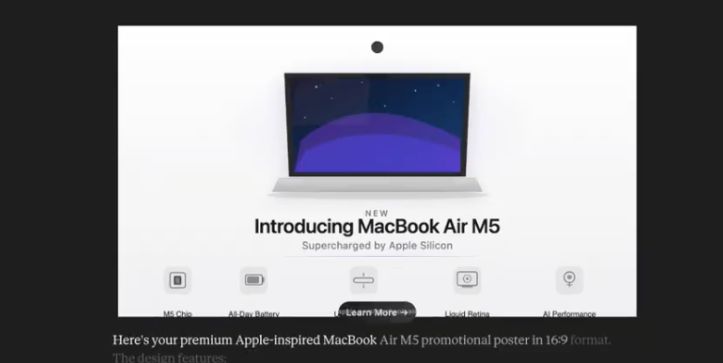
The first result followed the general structure of my prompt, but I did not assume that it was ready to publish.
Before downloading it, I checked whether the copy, visual hierarchy, spacing, and design elements matched the instructions I had provided.
Step 8: I Reviewed the Generated Design
Before downloading the visual, I reviewed the result to see how closely it matched my original prompt.
The design included the main elements I had requested, including the laptop, headline, feature icons, supporting text, and call-to-action section.
I also checked the smaller details, such as:
- Headline spelling
- Feature labels
- Text alignment
- White space
- Image quality
- Call-to-action placement
- Overall visual hierarchy
This step was important because an AI-generated design can look complete at first glance while still containing text or layout issues.
The overall layout followed the requested direction, but I would still treat the first result as a draft.
Before publishing an AI-generated visual, I recommend checking every text element, product claim, image, and branding detail manually.
Step 9: I Downloaded the Design
Once I had reviewed the result, I opened the three-dot menu attached to the generated visual.
Claude displayed three options:
- Copy to clipboard
- Download SVG
- Download PNG
PNG is the more practical option when you want to use the design in a blog article, social media post, email, or website.
SVG is more useful when you need a scalable file or plan to make further edits in a compatible design tool.
The copy option can be useful when you want to paste the visual directly into another application.
After selecting the download option, the browser displayed a confirmation and opened the file-saving window.
SVG is more useful when you need a scalable file or plan to make further edits in compatible vector graphics software.
Step 10: I Opened the Final Downloaded Design
After downloading the file, I opened it separately to inspect the final result.
This gave me a clearer view of the image quality, text readability, spacing, and overall composition outside the Claude interface.
Opening the exported file is a useful final check because the design may look slightly different when viewed at its actual size.
I would also confirm that the image dimensions match the platform where I plan to use it.
What I Learned From Connecting Canva to Claude
The overall process was straightforward.
I found Canva in Claude’s Connectors Directory, approved the account permissions, entered a design prompt, reviewed the result, and downloaded the visual.
However, the account connection was not the most important part of the process.
The quality of the prompt had a much bigger effect on the result.
A short request such as “Create a laptop poster” would leave Claude and Canva to make too many decisions on their own. By specifying the aspect ratio, layout, background, headline, feature icons, call to action, and visual style, I gave the tools a much clearer direction.
The generated result also showed why human review is still necessary.
Even when a design looks polished, I would still check:
- Spelling and grammar
- Product specifications
- Pricing or promotional claims
- Brand colors and fonts
- Logo usage
- Text contrast
- Mobile readability
- Final image dimensions
For me, the connector is best used to produce a starting point rather than a completely finished design.
Common Issues You May Encounter
Although the demonstrated process worked without a major interruption, your experience may differ depending on your account and browser settings.
Canva Does Not Appear in Claude
Check whether connectors are available on your Claude account and whether your organization has restricted third-party integrations.
The connector may also appear under a different section if Claude has updated its interface.
The Authorization Page Does Not Open
Check your browser’s pop-up, redirect, and privacy settings.
You can also try signing out of additional Canva accounts before restarting the process.
Canva Opens the Wrong Account
Log out of Canva and sign back in with the account you want to connect.
Always confirm the active account before approving permissions.
The Generated Design Contains Incorrect Text
Use shorter labels and provide the exact wording you want Claude to include.
Even then, proofread the final design manually.
The Download Option Does Not Appear
Wait until the design has finished generating and check for the three-dot menu near the visual.
The available options may vary depending on the design and account.
Is Connecting Canva to Claude Worth It?
Based on this workflow, connecting Canva to Claude can be useful when you want to turn a written idea into an initial design quickly.
The process reduced the need to move between separate tools while preparing the first draft. I could describe the visual in Claude, generate it through Canva, review the result, and access the download options from the same conversation.
However, I would not use the output without checking it first.
The connector can save time during brainstorming and early design production, but it does not replace proofreading, factual verification, or final design review.
The best results are likely to come from using Claude and Canva to create the initial concept, then refining the design before publishing it.
For a more traditional browser-based design workflow, read my Canva vs Adobe Express comparison.
Frequently Asked Questions
Can Claude create a Canva design from a prompt?
Yes. After Canva is connected, you can give Claude a written design brief and ask it to create the visual through the Canva connector.
The result will depend on how clearly you describe the format, layout, text, style, and intended use.
Do I need to connect my Canva account first?
Yes.
Claude needs permission to access Canva before it can use the connector. The setup involves selecting Canva, reviewing the requested permissions, and approving the connection.
Can I download the generated design?
In this workflow, the generated design could be copied to the clipboard or downloaded as an SVG or PNG.
The available options may vary depending on your account and the type of design generated.
Should I publish the first design Claude creates?
I would review it before publishing.
Check all text, product details, claims, images, branding, dimensions, and layout. If something is incorrect, revise the prompt or edit the design before using it.
Final Verdict
Connecting Canva to Claude made it easier to move from a written idea to a visual first draft.
The setup required only a few steps, and the generated result appeared directly inside the Claude conversation.
What made the biggest difference was the level of detail in the prompt.
By clearly describing the layout, aspect ratio, subject, supporting elements, and visual style, I gave Claude and Canva enough direction to create a more structured result.
I would use this workflow to speed up the initial design process, but I would still review and refine the output before adding it to an article, campaign, or client project.