
If you’re looking for a complete review of SellerPic, good luck finding one that actually helps!
I say this because there are plenty of SellerPic reviews on Shopify, G2, Trustpilot, Product Hunt, AppSumo, and other platforms.
Going through all of them and figuring out whether SellerPic fits your ecommerce workflow can take time, which is why I’ve done it for you!
I have gone through various user reviews and explored what the platform offers.
Here’s what you’ll get from this SellerPic review blog:
- What users have to say about SellerPic.
- Where it performs well and where it falls short
- Some alternatives to SellerPic
- A final verdict on whether it’s worth it in 2026
Keep reading to find out whether it’s worth adding to your product photo stack.
Quick Verdict: Is SellerPic Worth It?
SellerPic is worth considering if you run a Shopify store or ecommerce business and need product visuals without spending days on photoshoots, editing, or hiring models.
It’s especially useful if you sell fashion products, jewelry, accessories, or anything that looks better when shown on a real-looking model or in a lifestyle setting. The tool can help you create AI product photos, model shots, background edits, ad creatives, and short product videos much faster than doing everything manually.
That said, SellerPic isn’t perfect.
Some AI outputs may need a few retries before they look right. Complex product angles can confuse the tool, and you may still need to check details like hands, faces, shadows, product shape, and placement before using the image on your store or in ads.
So, my honest take is this: SellerPic is a solid AI product photo tool for ecommerce sellers who want faster, more affordable visuals. But if your brand needs 100% studio-level accuracy or highly detailed product photography, you should test the free plan first before moving to a paid plan.
Best for: Shopify sellers, fashion brands, jewelry stores, dropshippers, Etsy/Amazon sellers, and TikTok or Facebook ad creators.
Not ideal for: Brands that need perfect studio-quality results, complex product photography, full API automation, or completely predictable AI output every time.
My rating: 4.3/5
What Is SellerPic?

SellerPic is an AI product photo tool built for ecommerce sellers who want better product visuals without setting up a full photoshoot.
In simple words, you upload your product image, and SellerPic helps turn it into professional-looking product photos, AI model shots, lifestyle images, ad creatives, and even short product videos.
With SellerPic, you can create:
- AI product photos for ecommerce stores
- AI fashion model images
- Virtual try-on visuals
- Model swap images
- Product photos with removed or replaced backgrounds
- Product-to-video content
- Social media ad creatives
- Shopify-focused product visuals
- Images and videos for Shopify, Amazon, Etsy, TikTok, Instagram, and Facebook
So instead of hiring a photographer, model, designer, and video editor for every product, SellerPic gives you a faster way to create ecommerce visuals from one place.
What Real Users Are Saying About SellerPic?
Quick TLDR of User Reviews
✅ Great for: AI product photos, virtual try-on, Shopify visuals, product videos
❌ Weak on: Credit limits, output consistency, advanced integrations, complex product angles
Users on Reddit have mixed opinions, especially around credits, pricing, and whether some posts feel too promotional.
Meanwhile, on G2, Trustpilot, Shopify, Product Hunt, and AppSumo, the feedback is mostly positive.
Users like that SellerPic is easy to use, saves time, and helps create professional-looking ecommerce images without hiring models or photographers. However, even happy users mention that some outputs may need retries, especially with tricky product angles, faces, jewelry placement, or videos.
SellerPic has built a strong reputation across ecommerce and AI product photography platforms — especially among Shopify sellers, fashion brands, jewelry stores, and small online shops.
Here’s a quick snapshot:
- G2 – 4.7⭐/5 (3 reviews)
- Trustpilot – 4.8⭐/5 (680+ reviews)
- Shopify App Store – 4.5⭐/5 (100+ reviews)
- Product Hunt – 5.0⭐/5 (12 reviews)
- AppSumo – 4.5⭐/5 (55 reviews)
But numbers don’t tell the full story.
What’s Happening on Reddit
SellerPic does not have as many Reddit discussions as some larger AI tools, but the threads that do mention it are still useful.
Some users are impressed by the image-to-video feature, while others bring up credit limits, pricing, subscription confusion, and the usual AI product photography concern: results can look good, but they still need human checking.
Here are a few Reddit comments that stood out:
- “If you didn’t know, there is an Image to Video called ‘Sellerpic’ and in my opinion, it’s the best.”
- “yes, it’s really good. Downside is if you get a subscription at 2000 (which is $50 – expensive) credits/month and use the credits up in 2 days, you have to wait until your sub renews a month later until you can use it again.”
- “It’s expensive”
- “The subscription renew automatically and there is no way to cancell it/or it does not work for me.. There is no support or concact link so be aware of this before you pay.”
- “This is an ad for Sellerpic”
Reddit Thread on SellerPic Image to Video
User Reviews From Trustpilot
Trustpilot is much more positive overall.
Most users praise SellerPic for saving time, improving product visuals, and helping small ecommerce brands create model photos without booking a full shoot.
Most of the positive feedback revolves around:
- AI model photos for clothing and jewelry
- Fast product image generation
- Helpful customer support
- Easy workflow for non-technical users
- Lower cost compared to hiring models and photographers
But there are also a few complaints around output accuracy.
Some users mention that faces can look different, product placement can go wrong, or the tool may only work well “half the time” depending on the product image.
Here are a few recent Trustpilot reviews that stood out:
1. “Photos genuinely turn out great everytime”
Ashur Weber – ★★★★★ →Read the full review on Trustpilot
2. “Amazing for Jewelry Model photos creation”
Arif – ★★★★★ →Read the full review on Trustpilot
3. “some difference in faces seen”
Rajesh Ballal – ★★★★☆ →Read the full review on Trustpilot
4. “one photo has 2 heads”
Shopper – ★☆☆☆☆ →Read the full review on Trustpilot
User Reviews From G2
On G2, the reviews are positive but the sample size is small, so I wouldn’t rely on G2 alone.
Users like SellerPic because it makes professional ecommerce visuals faster and cheaper. They also mention useful features like background removal, lifestyle scenes, virtual try-on, and product video generation.
But G2 users also point out a few real limitations.
- One user liked how SellerPic made product visuals “quick and effortless,” especially for lifestyle images and virtual try-on. But they also said the “AI struggles with certain product types or angles.”
- Another user praised SellerPic for creating product videos from Shopify images and said it saves time for Facebook and TikTok campaigns. Their main complaint was the lack of a “public API and webhook.”
- A small business user said SellerPic helps them create product images without expensive photoshoots. Their only complaint was simple: they wanted “more tutorials and tips.”
How SellerPic Works
SellerPic is pretty simple to use. You don’t need to be a designer, photographer, or AI prompt expert to get started.
Here’s how the basic workflow looks.
Step 1: Upload a Product Image
First, you upload the product image you already have.
This can be a clean catalog photo, a flat lay, a supplier image, or a simple product shot taken on a plain background. The better your starting image is, the better the final AI output usually looks.
Step 2: Choose the Output Type
Next, you choose what kind of visual you want SellerPic to create.
For example, you can create:
- AI model shots
- Lifestyle product backgrounds
- Product ads
- Short product videos
- Background replacements
- Virtual try-on images
This is helpful because not every product needs the same type of image. A clothing brand may want AI fashion model photos, while a jewelry store may want close-up try-on visuals for rings, bracelets, or necklaces.
Step 3: Add Prompts or Select Templates
After that, you either select a template or add a prompt describing what you want.
This part matters more than people think.
If your prompt is too vague, the result may not match your idea. You’ll usually get better results when you clearly describe the model type, pose, background, lighting, camera angle, and where the product should appear.
For example, instead of saying “make this look nice,” you might say something like: “Show this bracelet on a female model’s wrist, soft studio lighting, clean beige background, luxury jewelry style.”
Step 4: Generate and Review the Results
Once you generate the image or video, SellerPic gives you an AI-created version based on your input.
Sometimes the first result looks great. Other times, you may need a few retries, especially if the product has a tricky angle or needs accurate placement.
This is where you should check small details like hands, faces, shadows, jewelry position, clothing fit, product shape, and whether the final image still represents the real product correctly.
Step 5: Export and Use It in Your Store or Ads
Once you’re happy with the result, you can export the image or video and use it across your ecommerce channels.
You can use SellerPic visuals for product pages, Shopify collections, TikTok ads, Meta ads, Pinterest pins, Instagram posts, email campaigns, or marketplace listings.
That’s the main appeal of SellerPic. It helps you turn one basic product image into multiple marketing-ready visuals without building a full creative team around every product.
SellerPic Features and Functionality Breakdown
If you want to understand whether SellerPic is actually useful, you can’t just look at one feature and call it a day.
The platform is not only an AI product photo generator. It also brings together model photos, virtual try-on, background editing, product videos, and ad creatives in one place.
That said, I’ve kept this section simple so you can quickly understand what each SellerPic feature does, where it helps, and where it may still need some patience.
I will share my thoughts on these SellerPic features in detail below:
- AI Product Photography
- AI Fashion Models
- Virtual Try-On
- Model Swap
- Background Removal and Replacement
- Product-to-Video Generation
- Social Ad Creative Generation
- Shopify-Focused Workflow
1. AI Product Photography
AI product photography is the main reason most ecommerce sellers will look at SellerPic in the first place.
The idea is simple: you upload a product image, and SellerPic helps you create cleaner, more professional-looking product visuals without setting up lights, cameras, models, props, and backgrounds.
For small brands, this can save a lot of time.
If you’re selling on Shopify, Amazon, Etsy, or even through Instagram, you already know how much product photos matter. A dull product image can make even a good product look cheap. A better image can make the same product feel more premium.
What it does
SellerPic can help you turn basic product photos into more polished ecommerce images.
You can use it to create:
- Clean product shots
- Lifestyle product images
- AI-generated product backgrounds
- Product images for ads
- Product visuals for social media
- More consistent images across your store
This is helpful if your current product photos come from suppliers, phone shots, or old catalog images that don’t look very polished.
What I liked
What I like about this feature is that it solves a very real problem.
Most small ecommerce sellers don’t have the budget to book a professional photoshoot every time they launch a new product. Even if they do, the process can be slow.
With SellerPic, you can create multiple product image styles from one starting photo.
That makes it useful for testing different visuals across product pages, ads, landing pages, and social media posts.
What could be better
The results still depend heavily on the original image.
If your uploaded product photo is blurry, badly cropped, or taken from a strange angle, the AI may struggle. This is especially true for products with shiny surfaces, tiny details, transparent materials, or complex shapes.
You may also need to generate a few versions before getting one that feels usable.
My take
SellerPic’s AI product photography feature is useful if you want faster, cleaner product visuals without hiring a full creative team.
Is it a complete replacement for professional studio photography? Not always.
But for everyday ecommerce images, ad testing, and social media content, it can save a lot of time.
2. AI Fashion Models
Coming to one of SellerPic’s most interesting features — AI fashion models.
This is especially useful for clothing brands, jewelry sellers, accessories stores, and fashion ecommerce businesses that want model-based product photos without hiring real models.
Instead of arranging a shoot, finding the right model, booking a photographer, and editing the final images, SellerPic lets you generate model photos using AI.
What it does
The AI fashion model feature helps you display your product on realistic-looking models.
This can be useful for:
- Dresses
- Shirts
- Jackets
- Watches
- Necklaces
- Earrings
- Bracelets
- Bags
- Sunglasses
- Beauty and lifestyle products
For fashion brands, this matters because customers usually want to see how a product looks when worn, not just how it looks on a plain background.
Why it’s useful
Flat product photos are fine, but they don’t always help shoppers imagine the product in real life.
A shirt looks different on a person than it does on a hanger. A bracelet feels more premium when shown on a wrist. A handbag looks more realistic when styled with an outfit.
That’s where AI fashion models can help.
You can create visuals that feel more lifestyle-focused without running a full model shoot.
What could be better
This is also where AI mistakes can show up.
You’ll want to carefully check faces, hands, arms, clothing fit, jewelry placement, skin texture, and product shape before publishing anything.
Sometimes AI model photos can look almost right, but one small detail may feel off.
And if you’re selling fashion products, accuracy matters. You don’t want the AI to change the fit, size, texture, or design of your product.
My take
SellerPic’s AI fashion model feature is one of its strongest use cases.
If you sell apparel, jewelry, accessories, or beauty products, this feature alone may be worth testing.
Just don’t publish the first image blindly. Review it like you would review any real product photo before adding it to your store.
3. Virtual Try-On
Virtual try-on is another feature that makes SellerPic useful for ecommerce sellers.
The idea is to help shoppers see how a product may look when worn or placed on a person.
This is especially helpful for products where real-life context matters.
What it does
SellerPic’s virtual try-on feature can help create images that show products on models or body parts.
For example:
- A necklace on a neck
- A ring on a hand
- A bracelet on a wrist
- A watch on an arm
- A shirt on a model
- Sunglasses on a face
- Earrings on ears
This can make product listings feel more complete.
Instead of only showing the product by itself, you can show how it might look in use.
Why it matters
Shoppers often hesitate when they can’t imagine the product on themselves.
This is common with jewelry, clothing, watches, and accessories.
A plain image of a bracelet may look nice, but a bracelet shown on a wrist gives the customer a better sense of size, style, and vibe.
For small stores, virtual try-on can make the shopping experience feel more premium without adding too much production cost.
What could be better
Virtual try-on needs accuracy.
If the product appears too big, too small, tilted strangely, or placed in the wrong spot, it can create the wrong impression.
This is why you should always compare the AI output with the real product.
Check whether the scale, shape, color, and position still look believable.
My take
Virtual try-on is a strong feature for jewelry, fashion, and accessories sellers.
It helps bridge the gap between plain product photos and real-life product usage.
But like most AI visual tools, it works best when you review the final image carefully instead of treating it as ready-to-publish every time.
4. Model Swap
Model swap is useful when you already have a product image but want to show it on a different type of model.
This can help brands create more variety in their visuals without reshooting the same product again and again.
What it does
With model swap, you can change the model in a product image while keeping the product as the focus.
This is helpful if you want to create visuals for different audiences, campaigns, or regions.
For example, you may want:
- A different model style
- A different pose
- A different age group
- A different look for ad testing
- A more brand-aligned model
- Multiple versions of the same product image
For fashion and lifestyle brands, this can be very useful.
Why it’s helpful
One product photo can become several different creative assets.
That means you can test which model style works better for your audience without booking multiple shoots.
For example, if you’re running Facebook or TikTok ads, you may want to test different visual angles. One ad may perform better with a clean studio-style model image, while another may work better with a casual lifestyle look.
Model swap gives you more room to experiment.
What could be better
This feature can still struggle with realism.
If the pose, body angle, clothing position, or lighting doesn’t match properly, the final image may look slightly unnatural.
This is not always a deal-breaker, but it does mean you’ll need to inspect the final output closely.
Pay attention to:
- Product placement
- Skin texture
- Lighting direction
- Shadows
- Hands and fingers
- Clothing edges
- Face consistency
My take
Model swap is a great feature for creating more visual variety.
It’s especially useful for ad creatives, product listings, and brand campaigns where you want to test different looks.
But I’d use it carefully for high-end product pages where every detail needs to look perfect.
5. Background Removal and Replacement
Background editing is one of those features that sounds basic until you actually need it.
If you’ve ever received supplier photos with messy backgrounds, poor lighting, or random objects in the frame, you’ll understand why this matters.
SellerPic gives ecommerce sellers a way to remove or replace backgrounds without opening Photoshop.
What it does
The background removal and replacement feature helps you clean up product images and place them in better scenes.
You can use it to:
- Remove cluttered backgrounds
- Create clean white-background product photos
- Add lifestyle backgrounds
- Match your store’s visual style
- Create seasonal product scenes
- Make product images look more consistent
This is useful for Shopify stores, Amazon listings, Etsy shops, and social media product posts.
Why it’s useful
Consistent product images make your store look more trustworthy.
If one product image has a white background, another has a messy table, and another has bad lighting, your store can feel unpolished.
SellerPic helps fix that by giving your product images a more consistent look.
It’s also useful for creating quick ad visuals.
For example, you can take one product and place it in a clean studio background, a luxury lifestyle scene, or a holiday-themed setup.
What could be better
Background replacement works best when the product edges are clear.
If your product has hair-like details, transparent parts, reflections, or shadows, the AI may not cut it out perfectly.
You may also need to check whether the new background matches the product lighting.
A product with bright studio lighting may look odd if placed into a dark outdoor scene.
My take
This is one of the most practical SellerPic features.
Even if you don’t use AI models or videos, background editing alone can help make your store images look cleaner and more consistent.
It’s not always perfect, but it’s a big time-saver for everyday ecommerce editing.
6. Product-to-Video Generation
Now this is where SellerPic becomes more than just an AI image tool.
The product-to-video feature helps turn static product images into short videos that you can use for social media and ads.
For sellers creating content for TikTok, Instagram Reels, Facebook ads, or Pinterest, this can be pretty handy.
What it does
SellerPic can help create short product videos from your product images.
You can use these videos for:
- TikTok ads
- Instagram Reels
- Facebook ads
- Product promos
- Shopify product pages
- Email campaigns
- Short-form social content
This is helpful because video usually grabs attention faster than a static image.
And let’s be honest, creating videos from scratch can be annoying if you don’t have editing skills.
Why it’s useful
Most ecommerce brands need more video content now.
Static images still matter, but platforms like TikTok, Instagram, and Facebook often reward motion-based creatives.
SellerPic gives you a faster way to create simple product videos without hiring a video editor or learning complicated software.
This is especially useful for small teams that need to produce content regularly.
What could be better
AI product videos can still feel limited compared to fully edited videos.
You may not get the same level of control over pacing, transitions, storytelling, captions, or scene-by-scene editing that you’d get from a dedicated video editor.
Also, if the original product image is weak, the video may not look that impressive.
My take
SellerPic’s product-to-video feature is useful for quick social content and ad testing.
I wouldn’t expect it to replace a polished brand video or professional product commercial.
But for short-form ecommerce content, it can help you move much faster.
7. Social Ad Creative Generation
If you run ecommerce ads, you already know the painful part: you constantly need new creatives.
One image may work for a few days, then performance drops. Then you need another angle, another background, another hook, another format.
SellerPic’s ad creative tools are useful for this exact reason.
What it does
SellerPic can help create product visuals for social media campaigns and paid ads.
You can use it to create:
- Product ad images
- Lifestyle ad visuals
- AI model-based creatives
- Product videos
- TikTok-style visuals
- Facebook and Instagram ad assets
- Seasonal campaign creatives
This gives sellers more options without depending on a designer for every small campaign.
Why it’s useful
Ad creative testing is all about speed.
You don’t always know which image will perform best until you test it.
SellerPic helps you create multiple visual directions from the same product, which can be useful for testing different audiences, offers, and platforms.
For example, you could test:
- A clean product-only image
- A lifestyle image
- A model photo
- A short product video
- A seasonal background
- A premium-looking ad creative
That kind of variety can be helpful if you’re running TikTok, Meta, or Pinterest ads.
What could be better
SellerPic can help with the visual side, but it’s not a full ad strategy tool.
You’ll still need to write strong ad copy, choose the right audience, test offers, and track performance.
Also, not every AI-generated image will be ad-ready. Some may need small edits before you use them in a live campaign.
My take
SellerPic is useful for ecommerce sellers who need fresh ad creatives quickly.
It won’t replace your entire marketing strategy, but it can make the creative production part much easier.
8. Shopify-Focused Workflow
SellerPic feels especially useful for Shopify sellers.
That makes sense because many ecommerce store owners want one simple workflow for creating product visuals, improving listings, and preparing ad creatives.
What it does
SellerPic’s Shopify-focused workflow helps store owners create better visuals for product pages, collections, ads, and social content.
You can use SellerPic images for:
- Shopify product pages
- Collection banners
- Product thumbnails
- Landing pages
- Promotional campaigns
- Store visuals
- Paid ad creatives
This makes it useful for sellers who don’t want to jump between too many design and editing tools.
Why it’s helpful
Shopify sellers usually need a lot of visual content.
One product may need a main image, lifestyle image, model image, social media post, ad creative, and maybe even a short video.
Doing all of that manually can take forever.
SellerPic brings many of those tasks into one AI product photography workflow.
That’s helpful if you’re a solo founder, dropshipper, small ecommerce team, or agency managing multiple product catalogs.
What could be better
Some advanced users may want deeper automation, API access, or more control over how images move between SellerPic and their store.
If you manage a large catalog with hundreds or thousands of SKUs, you’ll want to check how smoothly SellerPic fits into your current workflow before relying on it fully.
My take
SellerPic makes the most sense for Shopify sellers who need faster product visuals without hiring a photographer, model, designer, and video editor for every campaign.
For small and mid-sized ecommerce brands, the workflow feels practical.
For larger teams, it’s worth testing first to see whether the tool fits your existing creative process.
Final Take on SellerPic Features
SellerPic has a strong feature set for ecommerce sellers who need visual content quickly.
The strongest areas are AI product photography, AI fashion models, virtual try-on, background replacement, and short product videos.
The tool is especially useful if you sell fashion, jewelry, accessories, beauty products, or lifestyle items where visuals can directly affect customer trust.
That said, it’s still an AI tool.
You may need retries. Some outputs may look slightly off. And if your product has complex details, unusual angles, or needs perfect accuracy, you’ll need to review everything carefully before publishing.
My take?
SellerPic is not perfect, but it’s genuinely useful if your goal is to create better ecommerce visuals faster.
SellerPic Pricing Explained
SellerPic uses a credit-based pricing model, which means you pay based on how many AI images or videos you want to create.
This is pretty common with AI product photo tools, but it’s still something you should pay attention to. Why? Because if you need multiple retries to get the perfect image, those credits can disappear faster than expected.
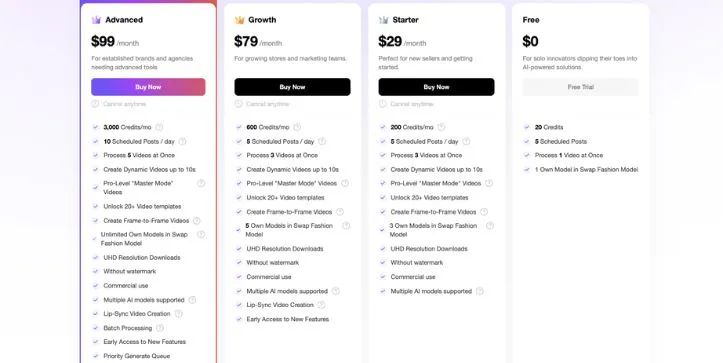
Here’s a quick breakdown of SellerPic pricing:
| Plan | Monthly Price | Credits | Best For | Key Limits |
| Free | $0 | 20 credits | Testing the tool | Limited output volume |
| Starter | $29/month | 200 credits/month | Small stores | Lower credit volume |
| Growth | $79/month | 600 credits/month | Growing stores | More output room |
| Advanced | $99/month | 3,000 credits/month | Heavy users and agencies | Higher cost but better scale |
The Free plan is useful if you just want to test SellerPic and see how the AI output looks with your own products. I’d recommend starting here before paying, especially if your products have tricky shapes, shiny surfaces, or detailed textures.
The Starter plan makes sense for small ecommerce stores that only need occasional product visuals, AI model photos, or background edits. It’s a good entry point, but 200 credits may feel limited if you’re creating lots of variations.
The Growth plan is better for stores that create visuals regularly. If you’re running product launches, social media campaigns, or paid ads every month, the extra credits give you more room to test different outputs.
The Advanced plan is built for brands, agencies, or heavy users who need frequent AI product photos, videos, and ad creatives. It costs more, but the 3,000 credits make it much easier to work at scale.
My take?
SellerPic’s pricing is fair if you use it to replace frequent product shoots, model photos, or basic video creation. But credits matter a lot. If your first output isn’t perfect and you need several retries, your actual cost per usable image can go up.
So before upgrading, test the free plan with your real product images and see how many credits it takes to get results you’d actually publish.
Before you upgrade, check the full credit and plan breakdown here:
SellerPic Pricing Explained
SellerPic Alternatives
SellerPic is useful, but it’s not the only tool in this space.
Depending on what you need, you may find another platform that fits your workflow better. Some tools are better for general design, some are better for background editing, and some are more focused on AI video ads.
Here’s how SellerPic compares with a few popular alternatives.
SellerPic vs Canva
Canva is the better choice if you need a complete design tool for social media posts, presentations, brand kits, thumbnails, flyers, ads, and general marketing graphics.
It’s more of an all-round design platform.
SellerPic, on the other hand, is more focused on ecommerce product visuals. It’s built for things like AI product photos, AI model shots, background edits, product videos, and product ad creatives.
So, if you want to design Instagram posts, YouTube thumbnails, or brand templates, Canva makes more sense.
But if your main goal is to turn product images into model photos, lifestyle shots, or ecommerce visuals, SellerPic feels more specific to that job.
My take?
Use Canva for general design. Use SellerPic when your product image itself is the main thing you want to improve.
Still comparing design tools? Check out the best options here: Best Canva Alternatives
SellerPic vs Photoroom
Photoroom is one of the strongest tools for background removal, product cleanup, and quick ecommerce photo editing.
If your main problem is removing messy backgrounds, creating clean white-background images, or making supplier photos look more consistent, Photoroom is a very solid option.
SellerPic goes a bit broader.
It doesn’t just help with background edits. It also includes AI models, virtual try-on, model swap, product videos, and social ad creatives.
So, Photoroom may be better if you want a fast product photo editor.
SellerPic may be better if you want an AI product photography tool that also helps create model-based visuals and video content.
My take?
Choose Photoroom for clean product editing. Choose SellerPic if you want more ecommerce creative options in one place.
SellerPic vs Claid
Claid is more focused on AI product image enhancement and ecommerce photo quality.
It’s useful for improving product images, fixing colors, sharpening visuals, generating backgrounds, and creating more polished ecommerce photos. It also feels more suitable for brands that care about image consistency and scalable product photo workflows.
SellerPic is slightly different.
It feels more attractive for sellers who specifically want AI model photos, virtual try-on images, product-to-video content, and social media ad creatives.
So, if you mainly want to improve image quality and make your catalog look cleaner, Claid is worth checking out.
But if you want to create model shots, lifestyle product photos, and short videos from your product images, SellerPic may be the better fit.
My take?
Claid feels stronger for product image enhancement. SellerPic feels stronger for ecommerce visuals that need models, try-on, and social ad content.
SellerPic vs Topview AI or Arcads
Topview AI and Arcads are more focused on video ads, AI avatars, UGC-style creatives, and short-form ad content.
These tools make more sense if your main goal is to create video ads for TikTok, Instagram, Facebook, or YouTube Shorts.
SellerPic is more product-photo and ecommerce-listing focused.
Yes, SellerPic can help create product videos, but its bigger strength is still AI product photography, AI model images, background replacement, and product visuals for online stores.
So, if you want avatar-led video ads or UGC-style videos, Topview AI or Arcads may be better.
But if you want better product photos, model visuals, and ecommerce image content first, SellerPic is more relevant.
My take?
Use Topview AI or Arcads for AI video ads. Use SellerPic for AI product photos and ecommerce listing visuals.
SellerPic vs Hiring a Photographer
Hiring a photographer gives you the most control.
You can control the lighting, model, product angle, styling, props, location, camera setup, and final editing direction. For luxury brands, premium campaigns, or complex products, this still matters a lot.
SellerPic gives you speed and scale.
You can create multiple product visuals without booking a studio, hiring models, or waiting days for edited files. That makes it useful for small brands, dropshippers, Shopify sellers, and teams that need lots of visuals quickly.
But there’s a trade-off.
A real photographer gives you more realism and creative control. SellerPic gives you faster output at a lower cost, but the results may need checking and retries.
My take?
If you need premium hero images, hire a photographer. If you need fast product visuals, ad creatives, and model-style images at scale, SellerPic is worth testing.
Want to compare SellerPic with other AI product photo tools?
Read: Best SellerPic Alternatives
Who Should Use SellerPic?
SellerPic is not for every business, but it makes a lot of sense for ecommerce sellers who need better visuals without slowing down their workflow.
If your store depends heavily on product images, lifestyle shots, and social media creatives, SellerPic can be a helpful tool to have in your stack.
SellerPic Is Best For
SellerPic is best for people who need product visuals quickly and don’t want to spend too much time or money on traditional photoshoots.
It’s a good fit for:
- Shopify store owners
- Fashion ecommerce brands
- Jewelry sellers
- Accessories brands
- Dropshippers
- Etsy and Amazon sellers
- Small teams without in-house designers
- Brands running frequent TikTok or Meta ads
- Stores that need many product visuals quickly
This is especially useful if you sell products that look better when shown on a model or in a lifestyle setting.
For example, a bracelet looks more realistic on a wrist. A shirt looks better on a model. A handbag feels more premium when shown in a styled scene.
That’s where SellerPic can help.
SellerPic Is Not Best For
SellerPic is not the right fit if you need perfect output every single time.
Like most AI product photo tools, the results can vary. Some images may look great quickly, while others may need a few retries.
You may want to skip SellerPic if you are:
- A brand needing perfect output every time
- An enterprise team requiring API-first workflows
- A business that needs complex product realism
- A luxury brand relying on full art-direction control
- A user who dislikes credit-based AI tools
If your product has complex materials, unusual angles, reflective surfaces, or tiny details, you should test the tool carefully before using it across your full catalog.
My take?
SellerPic is best for speed, scale, and everyday ecommerce visuals. It’s not always the best choice when every pixel needs to be perfect.
SellerPic Tips for Better Results
SellerPic can save you time, but you’ll get better results if you use it the right way.
Like most AI tools, the output depends on what you give it. A poor input image and a vague prompt can lead to average results. A clean product image and a clear prompt can make a big difference.
Here are a few tips I’d follow before using SellerPic seriously.
Use Clean Product Source Images
Start with the best product image you have.
Your source image should be clear, sharp, and well-lit. If the product is blurry, cropped badly, or hidden by shadows, the AI may struggle to understand it properly.
A clean product photo gives SellerPic a better starting point.
So before uploading, make sure the product shape, color, texture, and edges are easy to see.
Be Specific in Prompts
Don’t just write “make this look good.”
That kind of prompt is too vague.
Instead, describe what you actually want. Mention the model type, pose, background, lighting, product placement, camera angle, and style.
For example:
“Show this necklace on a female model, close-up portrait, soft studio lighting, beige background, luxury jewelry style, product centered and clearly visible.”
That gives the AI much more direction.
The clearer your prompt, the better your chances of getting a usable result.
Test One Product Category Before Scaling
Don’t upload your full catalog on day one.
Start with one product category first.
For example, test only your bracelets, shirts, handbags, or skincare products before using SellerPic for every SKU in your store.
This helps you understand how well the tool handles your product type.
If the results look good, then you can scale slowly. If the AI struggles, you’ll know early before spending too many credits.
Check Hands, Faces, Shadows, and Product Shape
This is very important.
AI-generated product images can look impressive at first glance, but small details may be off.
Before publishing, check:
- Hands and fingers
- Faces and skin texture
- Product shape
- Jewelry placement
- Clothing fit
- Shadows and lighting
- Product size and scale
- Background realism
This is especially important for fashion, jewelry, watches, sunglasses, and accessories.
A tiny mistake can make an otherwise good image look strange.
Save Winning Prompts
Once you find a prompt that works, save it.
This helps you create a more consistent visual style across your store.
For example, if one prompt gives you great jewelry model shots, reuse and adjust it for other jewelry products. If one background style works well for your Shopify store, keep it as a template.
This saves time and helps your product photos feel more on-brand.
Compare Outputs Against Real Product Photos
Never publish an AI-generated product image without comparing it to the real product.
The final image should not misrepresent the item.
Check whether the color, size, shape, design, texture, and details still match what the customer will actually receive.
This matters because better visuals should increase trust, not create confusion.
My take?
SellerPic works best when you treat it like a creative assistant, not a one-click magic button. Give it good inputs, review the outputs carefully, and use the best results where they make sense.
Final Verdict: Is SellerPic Worth It in 2026?
Yes, SellerPic is worth it in 2026 if you run an ecommerce store and need a faster, more affordable way to create product visuals.
It’s especially useful for Shopify merchants, fashion sellers, jewelry brands, dropshippers, and small teams that don’t want to spend money on constant photoshoots, models, designers, and video editors.
The biggest strength of SellerPic is speed.
You can take a basic product image and turn it into AI model photos, lifestyle shots, background edits, ad creatives, and short product videos without building a full creative setup around every product.
That’s a big deal if you’re regularly creating visuals for Shopify product pages, TikTok ads, Instagram posts, Meta campaigns, or marketplace listings.
But I wouldn’t call SellerPic a perfect replacement for traditional product photography.
It’s better to think of it as a production accelerator.
It helps you create more visual content faster, but you still need to review the results carefully. Some outputs may need retries. Some product angles may not work well. And if your product has tiny details, reflective surfaces, unusual shapes, or luxury-level styling needs, you may still want professional photography for your most important campaign images.
My honest recommendation?
Start with the free plan. Upload your actual product photos. Test a few different use cases like AI model shots, background replacement, and product videos. Then check how many credits it takes to get results you’d actually publish.
If the output quality works for your catalog, SellerPic can be a smart addition to your ecommerce toolkit.
If it struggles with your products, you’ll know before spending too much.
So yes, SellerPic is worth trying — just don’t treat it like a magic button. Treat it like a helpful AI creative assistant that can save you time, reduce production costs, and help you create better ecommerce visuals when used properly.
FAQs About SellerPic
Is SellerPic free?
Yes, SellerPic offers a free plan with limited credits. This is a good way to test the tool before paying for a monthly plan.
I’d suggest starting with the free plan first, especially if you want to see how SellerPic handles your real product images. AI tools can perform differently depending on your product type, image quality, angle, and prompt.
How much does SellerPic cost?
SellerPic has a free plan and paid plans that start at $29/month.
The paid plans are based on credits, so the more images or videos you want to generate, the more credits you’ll need. Pricing can change over time, so it’s always worth checking SellerPic’s official pricing page before buying.
What are SellerPic credits?
SellerPic credits are used when you generate AI product photos, model images, videos, or other creative outputs.
This matters because not every result will be perfect on the first try. If you need multiple retries to get a usable image, you may use more credits than expected.
Is SellerPic worth it?
SellerPic is worth it if you run an ecommerce store and need faster product photos, AI model shots, background edits, and short product videos.
It’s especially useful for Shopify sellers, fashion brands, jewelry stores, dropshippers, and small teams that don’t want to spend money on constant photoshoots.
But if you need perfect studio-level product photography every time, you should test it carefully before upgrading.
Is SellerPic legit?
Yes, SellerPic appears to be a legitimate AI product photo tool with reviews on platforms like Shopify, Trustpilot, G2, Product Hunt, and AppSumo.
That said, you should still test the free plan first. This helps you check whether the output quality, credit system, and workflow actually fit your business.
How does SellerPic work?
SellerPic works by taking your existing product image and turning it into new AI-generated visuals.
You upload a product photo, choose the type of output you want, add prompts or select templates, generate the image or video, review the result, and then export it for your store, ads, or social media.
Can SellerPic create AI model photos?
Yes, SellerPic can create AI model photos for ecommerce products.
This is one of its most useful features for fashion, jewelry, accessories, watches, sunglasses, bags, and beauty products. It helps you show products on realistic-looking models without booking a traditional photoshoot.
Is SellerPic good for Shopify?
Yes, SellerPic is a good fit for Shopify sellers because it is designed around ecommerce product visuals.
You can use it to create images for product pages, collection pages, ad campaigns, social posts, and product videos. It’s especially helpful if your Shopify store needs more visual content but you don’t have an in-house designer or photographer.
Can SellerPic make product videos?
Yes, SellerPic can help turn product images into short product videos.
These videos can be useful for TikTok ads, Instagram Reels, Facebook ads, Shopify product pages, Pinterest pins, and email campaigns.
Just keep in mind that SellerPic is better for quick product videos, not full cinematic brand commercials.
Is SellerPic good for jewelry photos?
Yes, SellerPic can be useful for jewelry sellers.
It can help create model-style photos for rings, bracelets, necklaces, earrings, and watches. This is helpful because jewelry often looks better when shown on a hand, wrist, neck, or model instead of only on a plain background.
Still, you should check the final output carefully. Jewelry placement, size, shine, and small details need to look accurate.
Is SellerPic good for fashion brands?
Yes, SellerPic is one of the more useful AI product photo tools for fashion brands.
You can use it for AI fashion models, virtual try-on visuals, model swap images, background replacement, and social ad creatives.
It’s helpful for clothing stores that need model photos but don’t want to organize a full photoshoot for every product.
Can SellerPic replace a photographer?
SellerPic can replace some basic product photography tasks, but not all of them.
It’s great for creating quick ecommerce visuals, social media creatives, product ads, and AI model shots. But for luxury campaigns, complex products, premium hero images, or high-control brand shoots, a professional photographer may still be the better choice.
Think of SellerPic as a creative shortcut, not a complete replacement for every photoshoot.
Are SellerPic images accurate?
SellerPic images can look realistic, but you should always review them before publishing.
AI tools may sometimes change small product details, create odd hands or faces, adjust the product shape, or place the item incorrectly. This is why it’s important to compare every AI-generated image with the real product.
Your product visuals should look better, but they should not mislead customers.
Can I use SellerPic images for ads?
Yes, SellerPic is built for creating ecommerce visuals that can be used in ads and marketing campaigns.
You can create product images, model shots, lifestyle visuals, and short videos for TikTok, Facebook, Instagram, Pinterest, and other platforms.
Before using the images in paid campaigns, check the final output for accuracy and make sure it matches your brand style.
What products work best with SellerPic?
SellerPic works best for products that benefit from lifestyle images or model-based visuals.
Good examples include:
- Clothing
- Jewelry
- Watches
- Sunglasses
- Bags
- Shoes
- Beauty products
- Accessories
- Lifestyle products
- Small ecommerce items
Products with very complex shapes, reflective surfaces, transparent materials, or tiny details may need more retries.
What are the biggest SellerPic limitations?
The biggest limitations are output consistency, credit usage, and AI accuracy.
Some images may look great right away. Others may need several attempts. You may also need to check hands, faces, shadows, clothing fit, jewelry placement, product shape, and background realism before publishing.
Also, advanced users may want deeper automation or API-style workflows, which may not be ideal for every team.
What are the best SellerPic alternatives?
Some popular SellerPic alternatives include Canva, Photoroom, Claid, Topview AI, Arcads, and traditional product photography.
Canva is better for general design.
Photoroom is strong for background removal and product cleanup.
Claid is useful for AI product image enhancement.
Topview AI and Arcads are more focused on AI video ads.
A photographer is still better when you need full creative control and perfect realism.
Who should use SellerPic?
SellerPic is best for Shopify store owners, fashion sellers, jewelry brands, accessories stores, dropshippers, Etsy sellers, Amazon sellers, and small ecommerce teams.
It’s also useful for brands running regular TikTok, Instagram, Facebook, or Pinterest campaigns.
If you need lots of product visuals quickly, SellerPic can save time.
Who should avoid SellerPic?
You may want to skip SellerPic if you need perfect output every time, full creative control, advanced API automation, or highly accurate photography for complex products.
It may also not be ideal if you dislike credit-based AI tools, because retries can use up credits faster than expected.
How do I get better results from SellerPic?
Start with a clean, sharp product image.
Then write a clear prompt that explains the model type, pose, background, lighting, product placement, camera angle, and style you want.
Also, test one product category first before using SellerPic across your full catalog. Once you find prompts that work, save them so your visuals stay consistent.
Is SellerPic good for beginners?
Yes, SellerPic is beginner-friendly.
You don’t need to know Photoshop, photography, or advanced AI prompting to start using it. That said, learning how to write better prompts will help you get better results.
The tool is simple enough for small business owners, creators, marketers, and Shopify sellers who want better product visuals without a complicated design workflow.