
The human brain can process visuals up to 60,000 times faster than text. That is why charts, diagrams, and illustrations are so effective at explaining ideas and helping people remember information.
The problem is creating those visuals. If you are not a graphic designer, turning written content into clean diagrams can take a lot of time. Even with design tools, you still have to think about layout, structure, and formatting.
This is where Napkin AI comes in. Napkin AI helps turn text into visuals automatically. You paste your content, and the tool generates diagrams and illustrations based on what the text is saying.
In this guide, we explain what Napkin AI does, how it turn text into visuals, what features actually matter, how pricing works, and where the tool succeeds or falls short in real workflows.
What is Napkin AI?
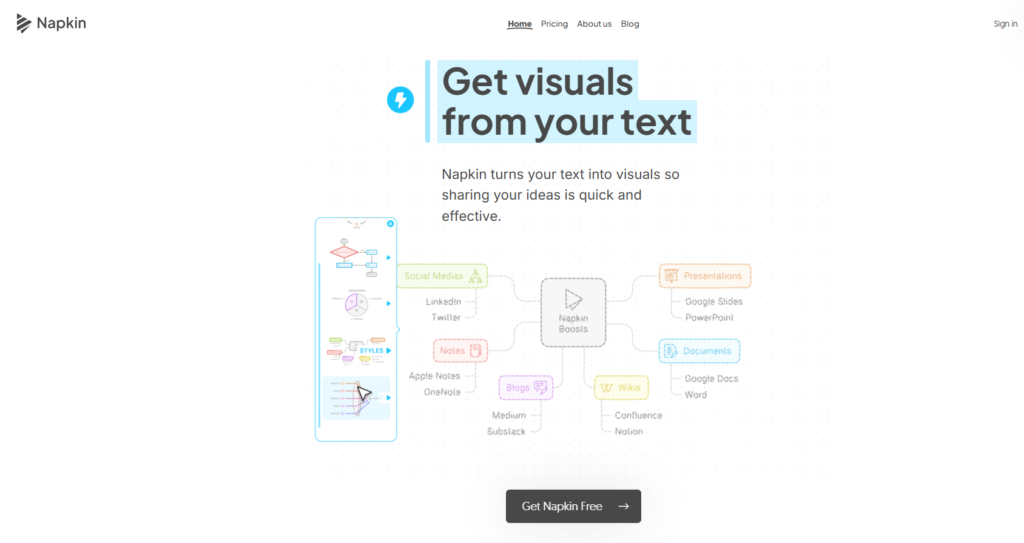
Napkin AI is a simple tool that turns text into visual formats like diagrams, charts, and simple illustrations. Instead of designing visuals manually, you work with text and let the tool handle the structure and layout. Napkin AI is built for people who think and write first.
You start with paragraphs, bullet points, or documents, and the tool reads that content to understand relationships such as steps, comparisons, or hierarchies. Based on that structure, it creates visuals that match the meaning of the text.
Key Features of Napkin AI
Napkin AI is built around one idea: turning text into visuals should be fast and straightforward. Its features focus on reducing effort while still giving users control over the final result.
Instant Text to Visuals
Napkin AI can generate visuals as soon as text is added. You can paste existing content or write directly in the editor, and the tool creates visuals based on the structure of the text.
Common visual formats include:
- Flowcharts
- Mind maps
- Process diagrams
- Simple infographics
There is no need to describe what kind of image you want. Napkin AI understands the context of the text and chooses suitable visual formats automatically.
No Prompting Required
Unlike many image tools, Napkin AI does not rely on written prompts. You do not need to explain what the visual should look like or how it should be arranged.
The tool focuses on meaning rather than instructions. This makes it easier to use, especially for people who are not familiar with prompt writing or design tools.
Also Read:
What is Jitter AI? Everything You Should Know Before Start
What is Genmo? Everything You Should Know
Fully Editable Visuals
Every visual created in Napkin AI tool can be edited. Users can:
- Change icons
- Adjust connectors
- Modify colors and fonts
- Rearrange layout and spacing
These controls allow you to fine-tune visuals so they match your message or brand without starting from scratch.
Elastic Design That Adapts to Content
Napkin AI visuals automatically adjust as content changes. If you add or remove text, the visual updates to fit the new structure. This makes it easier to revise content without breaking the layout or manually fixing spacing issues.
Custom Brand Styles
Paid plans allow users to create and apply brand styles across visuals. This helps keep fonts, colors, and overall appearance consistent. Brand styles are useful for teams that create visuals regularly and want a uniform look across presentations and documents.
Teamspace and Collaboration
Napkin AI includes a shared Teamspace for managing users, subscriptions, and access settings. Teams can collaborate in real time by sharing visuals through links. Depending on permissions, collaborators can:
- View visuals
- Leave comments
- Highlight content
- Edit visuals together
This makes it easier to review and refine visuals without sending files back and forth.
Key Things You Can Do With Napkin AI
Here’s a breakdown of everything you can do with Napkin:
1. Generate Visuals from Text
Napkin takes any block of text you provide and turns it into visuals like flowcharts, diagrams, mind maps, and more. The tool automatically selects the best visual format based on your content, and the quality of these visuals is impressively high.
2. Customize Visuals
You have full control over the look of your visuals. You can adjust:
- Colors: Match your brand or personal style with color choices.
- Shapes: Pick from different shapes to fit the flow of the information.
- Fonts: Choose from over 700 Google Fonts or upload your own.
- Icons: Add icons that align with your message.
- Connectors: Adjust the lines or arrows between elements.
- Layouts: Choose between horizontal, vertical, or square layouts.
3. Style Your Visuals to Match Your Brand
Napkin AI tool allows you to upload your brand’s fonts and colors, and it will automatically create several style options for you. Once set, applying your style is just a click away, ensuring consistency across all your visuals. Plus, you can upload an image (like your company’s logo), and Napkin will extract its colors for you.
4. Sketch Directly on Your Visuals
The Sketch feature lets you add personal touches to your visuals. You can draw freehand, make annotations, or add elements that aren’t available in the templates, giving you even more creative control.
5. Export Visuals in Various Formats
You can download your visuals in multiple file formats:
PNG for high-quality images.
PDF for printable versions.
SVG for scalable vector graphics.
PPTX for editable PowerPoint slides.
This flexibility allows you to use the visuals across different platforms, from presentations to blog posts, and even social media.
6. Elastic Design & Text-Visual Sync
Napkin’s elastic design automatically adjusts your visuals to fit the content as you add or change text. No more worrying about layouts or spacing issues—everything resizes smoothly. It keeps everything structured and readable, even as your ideas evolve.
7. Team Collaboration
Napkin supports real-time collaboration, so multiple people can work together on the same visual simultaneously. This feature is perfect for group projects, brainstorming sessions, or when you want instant feedback from your team.
8. Upload and Enhance Your Own Images
You can upload your own images and edit them within Napkin. Add annotations, sketch on top, or change the shape of elements to make the image more visually appealing. When you’re done, you can easily download the enhanced image.
9. Tested AI-Generated Visuals
Napkin does a great job at creating visuals based on text. Whether it’s a summary, comparison, or conclusion, Napkin analyzes the text and turns it into an appropriate visual representation. If any mistakes are made, you can edit them manually, which adds a layer of customization.
How to Use Napkin AI to Create Stunning Visuals in Seconds
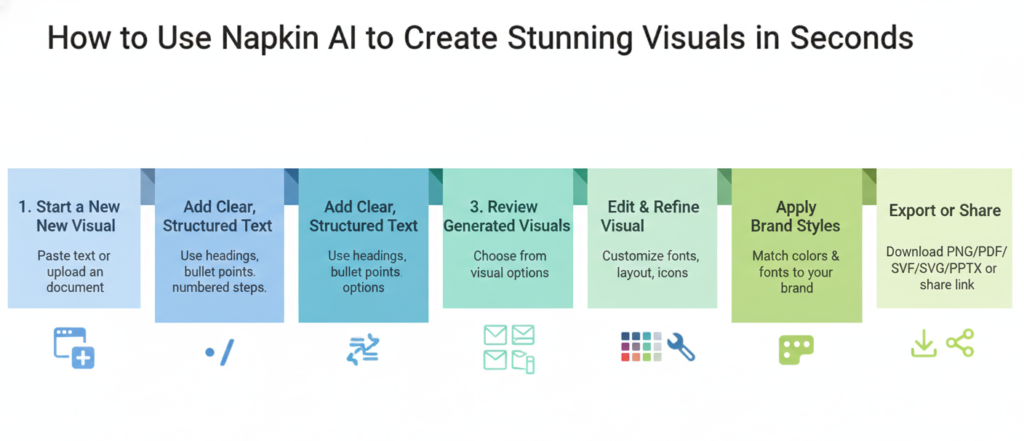
Creating visuals in Napkin AI is straightforward. The process is designed to move quickly from written content to a finished visual without unnecessary steps.
Step 1: Start a New Visual
Log in to Napkin AI and open a new project. You will see a blank editor where you can begin adding content. You can either paste text directly or upload an existing document. Both options work the same way once the content is inside the editor.
Step 2: Add Clear, Structured Text
Paste your text into the editor. For best results, use:
- Headings
- Bullet points
- Numbered steps
For example, a list of steps in a process or a short explanation broken into sections works well. You do not need to describe what the visual should look like. The tool reads the text and handles the structure on its own.
Step 3: Review the Generated Visuals
After the text is added, Napkin AI automatically suggests several visual options. Each option presents the same information in a different layout.
You can scroll through these suggestions and choose the one that best fits your goal, whether it is explaining a process, comparing ideas, or showing a sequence.
Step 4: Edit and Refine the Visual
Once you select a visual, you can edit it directly. Common edits include:
- Updating text labels
- Rearranging elements
- Changing icons or colors
- Adjusting spacing
These edits help improve clarity and make the visual easier to read.
Step 5: Apply Brand Styles if Needed
If you are using a paid plan, you can apply saved brand styles. This keeps colors, fonts, and layout consistent across all visuals. This step is especially useful for teams creating visuals for presentations, reports, or client work.
Step 6: Export or Share the Visual
When the visual is ready, export it in the format you need. All users can export PNG and PDF files. Paid plans also include SVG and PowerPoint exports. You can also share the visual using a link, which allows others to view or comment without downloading files.
Napkin AI’s Pros and Cons
Using the Napkin AI tool, certain strengths stand out clearly. At the same time, some limits are worth understanding before relying on it for serious work.
✅Napkin AI Pros
Fast visual creation
Napkin AI turns text into visuals in seconds. You can paste content, select a visual style, and export without waiting or setting things up. This speed makes a real difference when you are working under deadlines.
Beginner friendly
You do not need design experience to use Napkin AI. Non designers can create clean diagrams, flowcharts, and frameworks without learning tools like Figma or spending hours adjusting slides in PowerPoint.
Wide range of visual types
Napkin AI handles many common business visuals well. This includes mind maps, process flows, frameworks, comparisons, timelines, and cause and effect diagrams. It works especially well for storytelling and explaining ideas clearly.
Strong export options
Paid plans allow exports in PNG, PDF, PowerPoint, and SVG formats. This makes it easy to reuse visuals in blog posts, slide decks, Notion documents, or client work without reformatting.
Branding support on paid plans
Paid plans include brand styles and custom font uploads. If you work with clients or need consistent visuals across a team, this helps keep things aligned.
❌Napkin AI Cons
Limited brand customization
While you can apply styles, you cannot save full brand color palettes. In many cases, colors must be selected again for new visuals. This adds friction when working on branded or client projects.
Not suited for complex diagrams or deep collaboration
Napkin AI prioritizes speed over precision. It is not ideal for detailed technical diagrams, complex schematics, or workflows that require many people editing at the same time. Tools like Figma or Lucidchart are still better for that kind of work.
Free plan feels restrictive
The free plan includes around 500 credits per week. If you create visuals often, this limit is reached quickly. The watermark on exports also makes the free plan less useful for professional work.
Occasional structure issues
Napkin AI does not always interpret complex frameworks correctly. In some cases, relationships between elements need to be fixed manually or regenerated a few times.
Napkin AI Pricing and Plans
Napkin AI tool offers several pricing plans to fit different levels of use. You can choose a plan based on how often you make visuals and what export options you need. All plans include the core ability to turn text into visuals, but they differ in limits, exports, and extras.
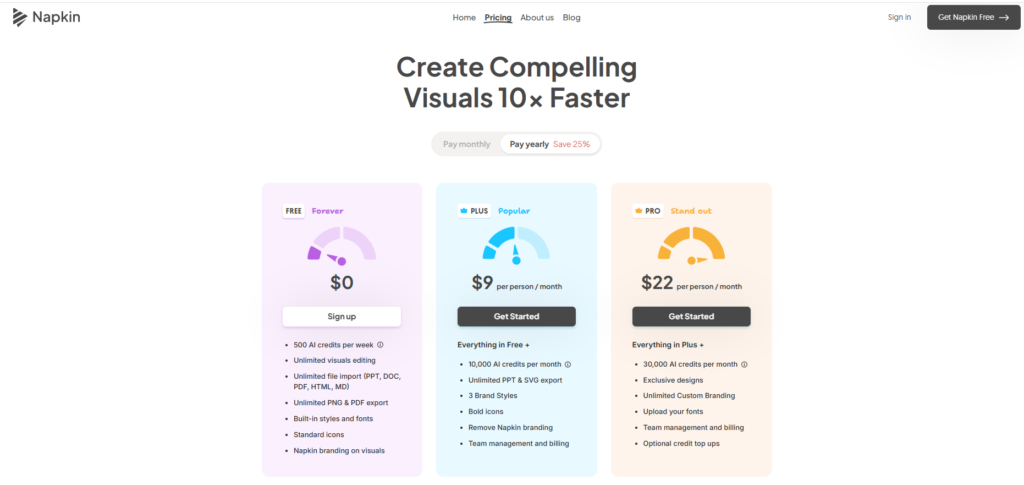
Free Plan
The Free plan is a good way to try Napkin AI or use it for occasional projects.
What is included:
- A set number of credits each week to generate visuals
- Basic features for text to visuals
- Export to PNG and PDF
- Napkin branding on visuals
This plan does not include advanced exports or brand styling features. It is best for personal use or testing the tool.
Plus Plan
The Plus plan is the first paid level. It gives more credits and access to more export formats.
What is included:
- A larger monthly credit allowance
- Export to SVG and PowerPoint
- Ability to remove Napkin branding
- A limited number of saved brand styles
- Basic team controls
This plan is useful if you create visuals regularly and want more flexibility.
Pro Plan
The Pro plan is designed for heavier use and teams that work together often.
What is included:
- A much higher monthly credit allowance
- Export to all formats including SVG and PowerPoint
- Unlimited brand styles
- Custom font upload
- Priority access to new features
This plan is best for users who create visuals often or for work that needs consistent branding.
How Credits Work
Napkin AI uses credits to generate visuals. Each time you convert text into a visual, the credits are used based on the amount of text selected. Larger or more complex visuals use more credits. Credits reset based on your plan cycle. If you run out of credits before the cycle ends, you may need to wait for the next reset or upgrade your plan.
Final Verdict
Napkin AI is a useful tool for turning text into visuals quickly. It works best for creators who want clear diagrams without spending time on design work.
You can adjust icons, fonts, colors, and labels, and export visuals in multiple formats. This makes it easy to use the visuals across blogs, slides, and documents.
Custom styles help keep branding consistent and reduce the time spent editing visuals. During testing, this made it easier to focus on content instead of layout. If you work with text heavy content and need visuals fast, Napkin AI is worth trying.